
Introduction:
PyWinAuto is a powerful Python library that helps automate Microsoft Windows Graphical User Interface (GUI) applications; in other words, UI automation uses software tools to execute tests on an application’s user interface while interacting with windows, menus, and controls.
Allure is a lightweight, versatile reporting tool that makes it possible to create thorough, useful test automation reports that span everything from visual reporting to desktop application testing, and choosing the right automation tools matters for effective UI automation.
The usage of PyWinAuto and Allure for end-to-end GUI automation testing is demonstrated in this document. The example code can be expanded to accommodate more test situations and is organized for clarity. It launches the PyQt-based Python application (Application.py file), interacts with several controls (buttons, checkboxes, labels, radio buttons, text fields), and confirms the intended functionality. The testing script (PyWinAuto_Testing.py file) that uses PyWinAuto is designed to simulate user input and verify the application’s output, and automated scripts provide broader coverage than manual testing with faster execution and immediate feedback.
Features and Use in Desktop App
1. PyWinAuto
Features:
- UI Automation: Helps with windows GUI automation by simulating keyboard actions, mouse clicks, and User Interface (UI) element reading to interact with Windows applications
- Multiple Backends: Supports Win32 API and MS UI automation backends
- Window & Control Handling: Recognizes and works with buttons, text boxes, windows, and menus, and the core concept is attribute-based access to controls in Python
- Recording & Playback: Automates repetitive tasks by capturing and replaying user actions
- Cross-Version Support: Supports both 32-bit and 64-bit applications and is compatible with various Windows versions
Use:
- Automating repetitive tasks performed in desktop programs
- GUI testing
2. Allure
Features:
- Rich Reports: Produces aesthetically pleasing HTML reports that include data, timelines, and graphs
- Integration: Compatible with well-known test frameworks such as Robot Framework, JUnit, PyTest, and TestNG
- Step Logging: Enables detailed recording of screenshots, attachments, and test steps
- Classification: Facilitates the grouping of tests according to features, storylines, or severity
- Trend Analysis: Monitors trends and test history over several runs
- CI/CD Friendly: Easily integrates with GitHub Actions, Jenkins, GitLab CI, and other pipelines
Use:
- Improving test visibility in Quality Assurance (QA) processes
- Giving clear, interactive test results to stakeholders
- Using thorough logs and screenshots to debug unsuccessful tests
Pre-Requisites or Dependencies: Python Modules
- Python Interpreter version 3 or higher; use a 64-bit Python interpreter when installing 64-bit Pywinauto https://www.python.org/downloads/
- Java version 8 or above https://www.java.com/en/download/manual.jsp
- Allure Report CLI https://allurereport.org/docs/v2/install-for-windows/#install-the-allure-report-cli
- PyQt5 (Refer the Readme.md file for installation steps)
- pywinauto, a set of python modules and libraries for Windows GUI automation; install with pip install -U pywinauto, or use conda install -c conda-forge pywinauto as an alternative (Refer the Readme.md file for installation steps)
- pytest (Refer the Readme.md file for installation steps)
- allure-pytest (Refer the Readme.md file for installation steps)
- Pillow (Refer the Readme.md file for installation steps)
How to incorporate Windows GUI Automation in your code:
1. Tools for examining your application’s user interface elements:
- The Integrated Inspection Tool in PyWinAuto (no external tool needed)
PyWinAuto’s print_control_identifiers() function, which outputs a tree of controls with IDs, titles, and routes, prints the UI hierarchy to the console if you’d rather stay in code. Use this to create locators without the need for other tools - Inspect.exe (UI Automation Verify) – the official Microsoft tool
It is helpful to recognize controls in PyWinAuto because it displays the entire UI tree, automation IDs (AutomationId), names, classes, and more. The Windows Software Development Kit (SDK) includes it. It is located at C:\Program Files (x86)\Windows Kits\10\bin\<version>\x64\Inspect.exe (substitute <version> with the SDK version, like 10.0.19041.0)
2. List of accessibility technologies:
- Win32 API (backend=”win32″) – a default backend
MFC, VB6, VCL, basic WinForms features, and the majority of old legacy applications - Microsoft UI Automation (backend=”uia”)
Web browsers, WinForms, WPF, Store applications, and Qt5
3. An illustration for recognizing the UI components:
1) Printing control identifiers using PyWinAuto’s Built-In Tool
- print_control_identifiers() is a debugging and exploring technique that produces a hierarchical list of all UI controls (buttons, text fields) in the designated window, along with their types, properties, and identifiers
- The sample output from print_control_identifiers is shown below:
Link: print_control_identifiers-Output
2) Using the tool Inspect.exe
- For UI automation, ensure that the Automation ID / Object Name / Accessibility Name is defined in your application code
- This is an example of how to set the Automation ID or Accessibility Name in our PyQt5 application:

- Run your program now, then launch Inspect.exe to view all open windows:
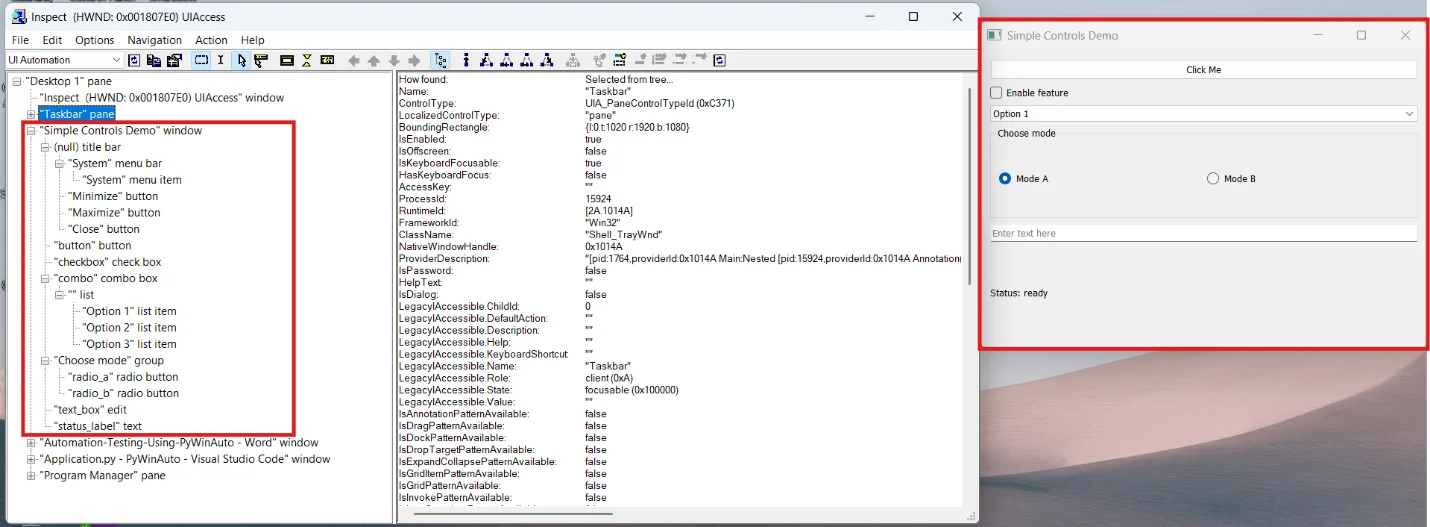
- Check the available name in the Name attribute that you previously assigned in your code:
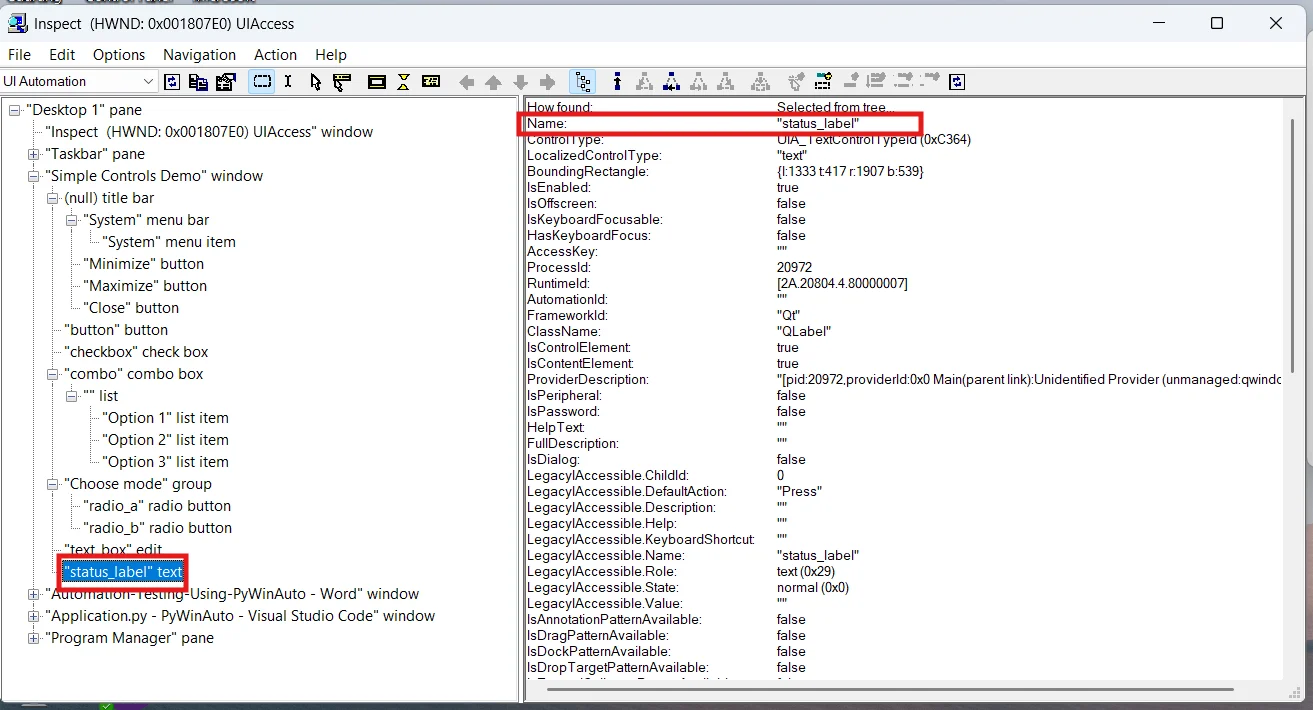
Example code:
- Application.py file (the actual Python application)
Link: Application_py File - PyWinAuto_Automation_Testing.py file (Automation testing script)
Link: PyWinAuto_Automation_Testing_py File - Readme.md file (Contains setup instructions and information about the application)
Link: Readme_md File
Code Explanation:
1. Launching and shutting down the application in the test fixture:
- Mention the path to the application script and the Python executable:

- Create a test fixture for the module that launches the application, creates the PyWinAuto application object, and closes the test:
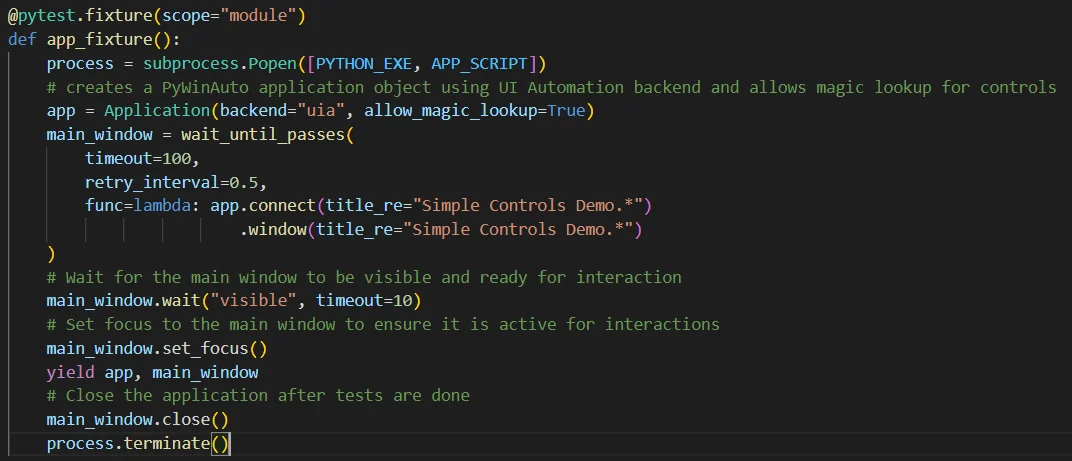
2. Test to verify: Button click updates status label
- To locate controls, use the print_control_identifiers() function
- Locate the controls for the button and status label:

- Take JPEG pictures of the mouse click event before and after, and include them in Allure reports:
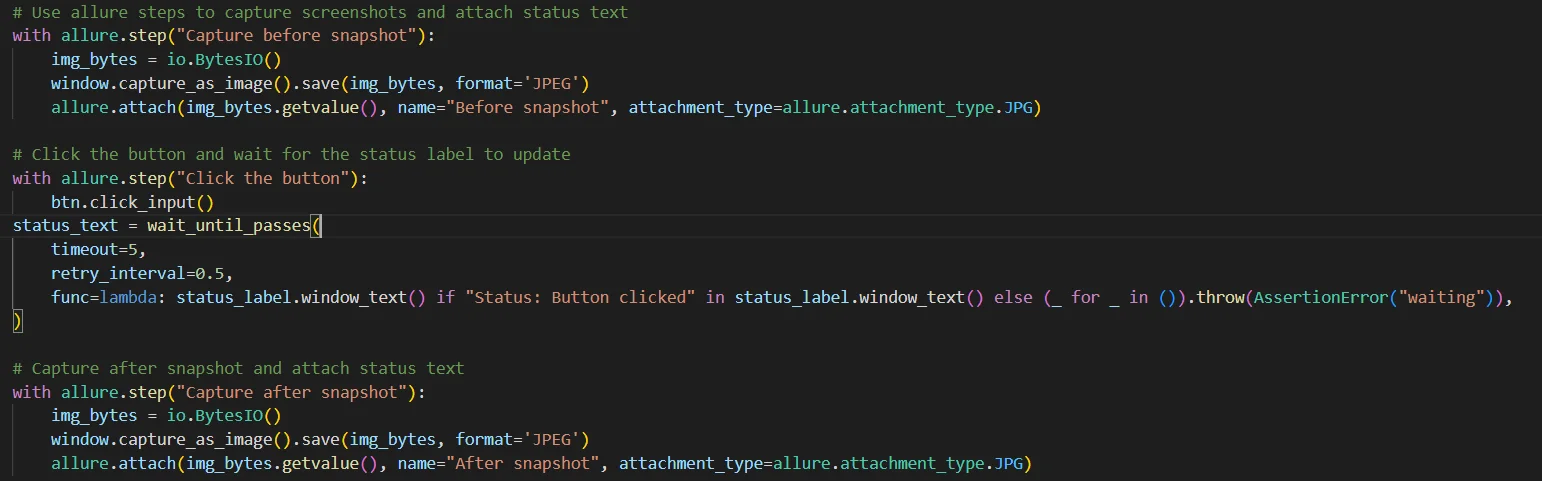
- Allure.step() – This function helps with reporting clarity
- io.BytesIO() – Creates an in-memory buffer
- window.capture_as_image() – Captures the window as a PIL Image
- .save(img_bytes, format=’JPEG’) – Saves as JPEG to the buffer
- allure.attach() – Attaches the JPEG image to the Allure report with a descriptive name
- btn.click_input() – Performs a real mouse click on the “Click Me” button
- wait_until_passes() – A polling method that retries a function until it succeeds or leaves due to a timeout
- timeout=5 – The maximum amount of time to wait is 5 seconds
- retry_interval=0.5 – Check every 0.5 seconds
- func=lambda – Verifies whether “Status: Button clicked” is present in the label
- Attach the status text to the Allure report:

3. Test to verify: Toggle checkbox updates status label
- Locate the controls for the status label and checkbox:

- Here, two different approaches to locating controls using object names and regex are demonstrated:
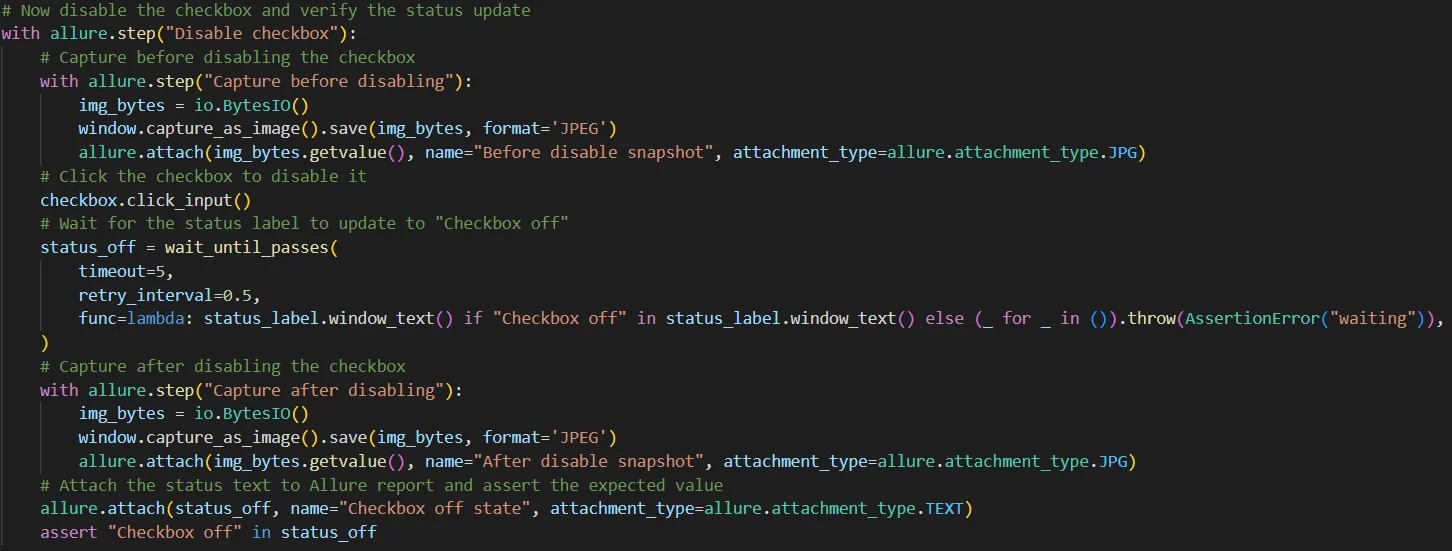
- Take screenshots both before and after the checkbox is checked:
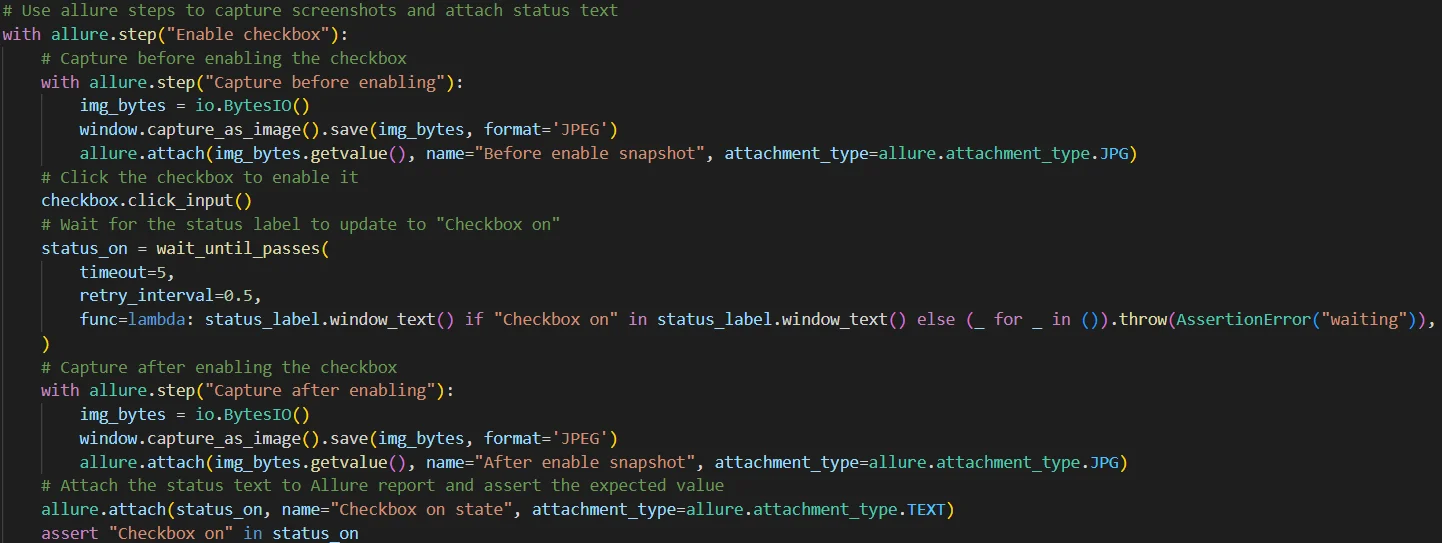
- Take screenshots both with and without the checkbox unchecked:
4. Test to verify: Select combo option and verify status
- Locate the controls for the status label and combo box:

- Select “Option 2” from the combo box, wait for the status label to change, and take screenshots both before and after:
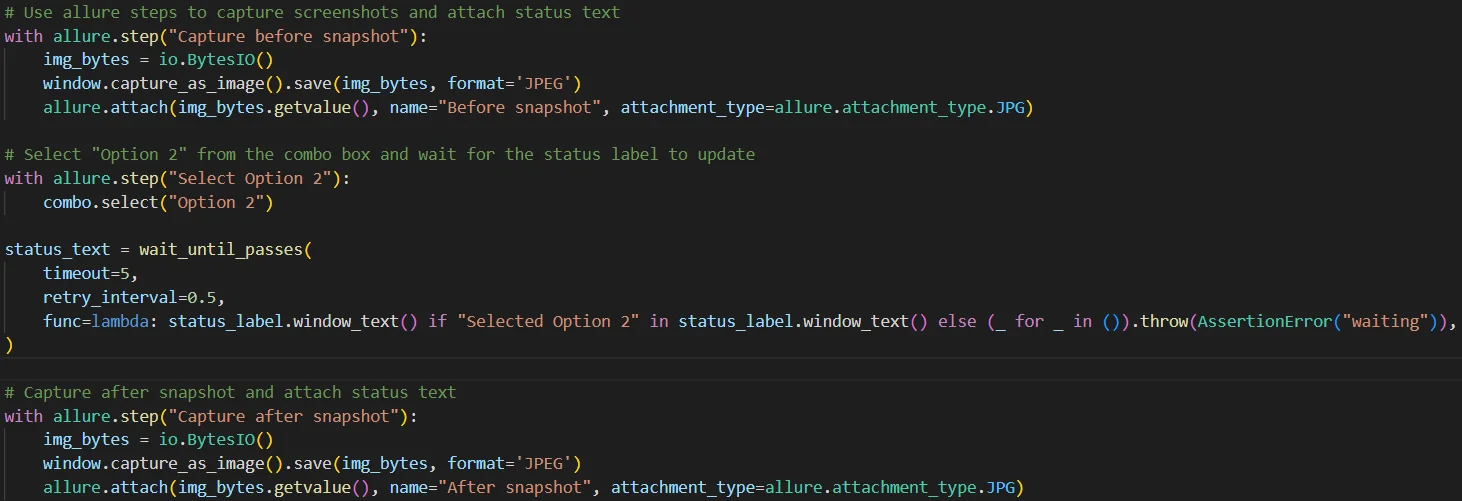
- Attach the status text to the Allure report and assert the expected value:

5. Test to verify: Select combo option and verify status
- Locate the controls for the status label and radio buttons:

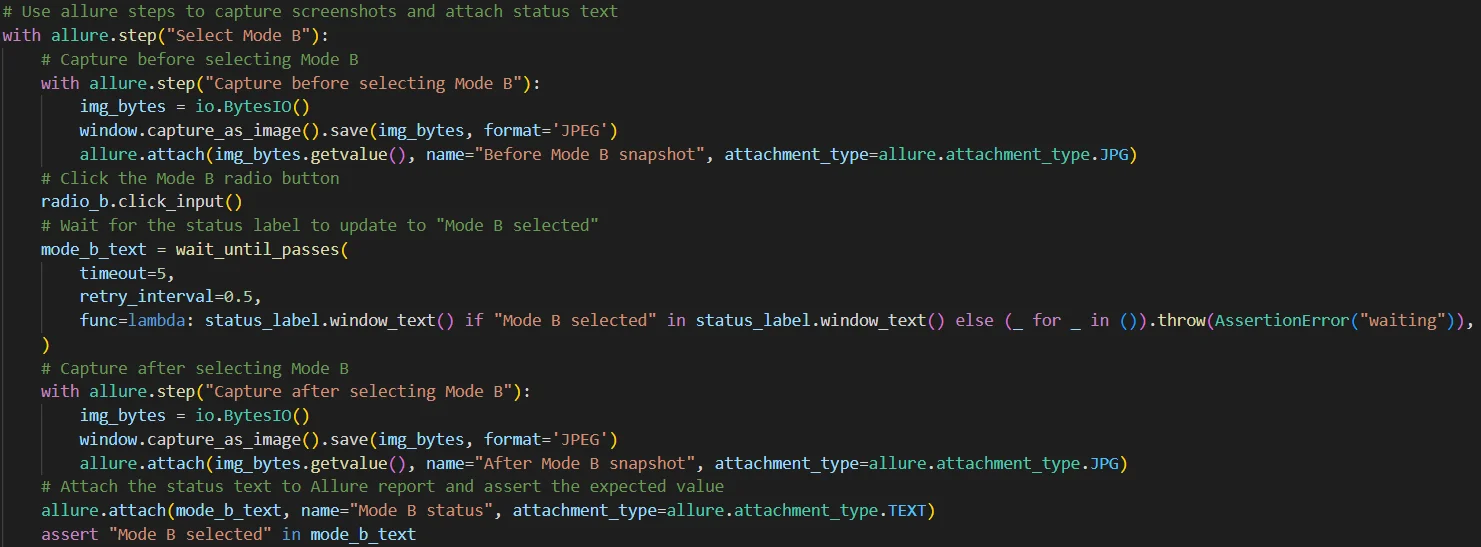
- Use the Allure steps to capture screenshots and attach the status text for Mode B:
- Now, choose Mode A and check the status update:
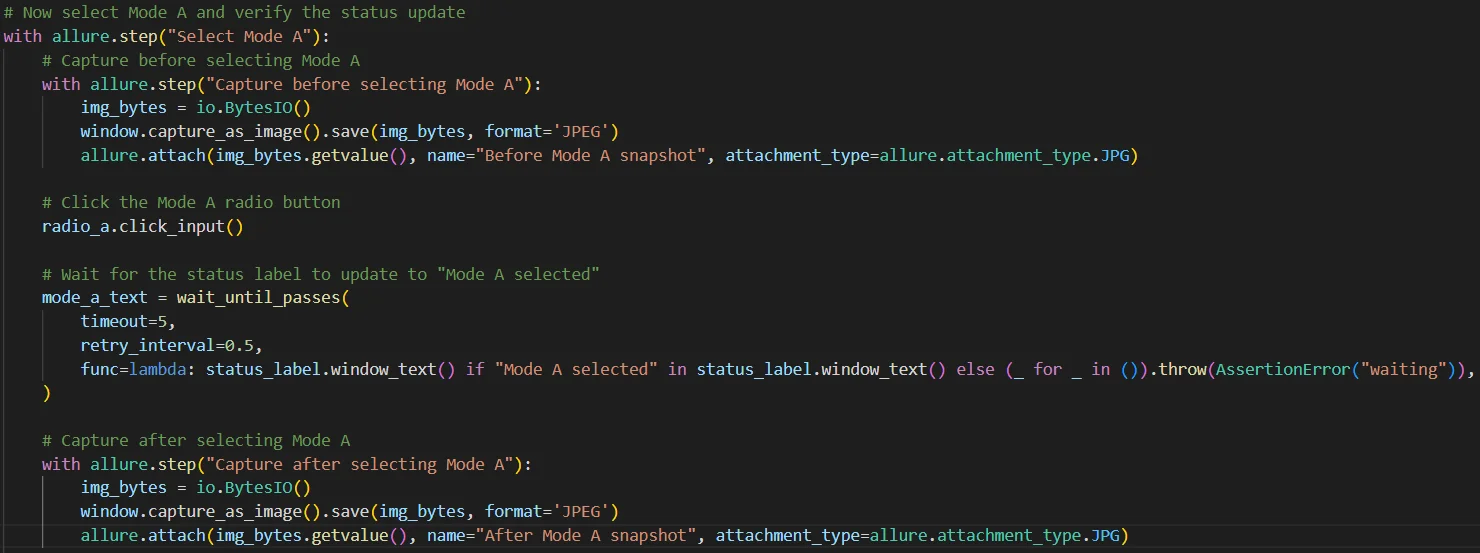
- Attach the status text to the Allure report and assert the expected value:

6. Test to verify: Enter text and verify status update
- Locate the controls for the status label and text box:

- Before and after modifying content, use the Allure steps to take screenshots and append the status text:
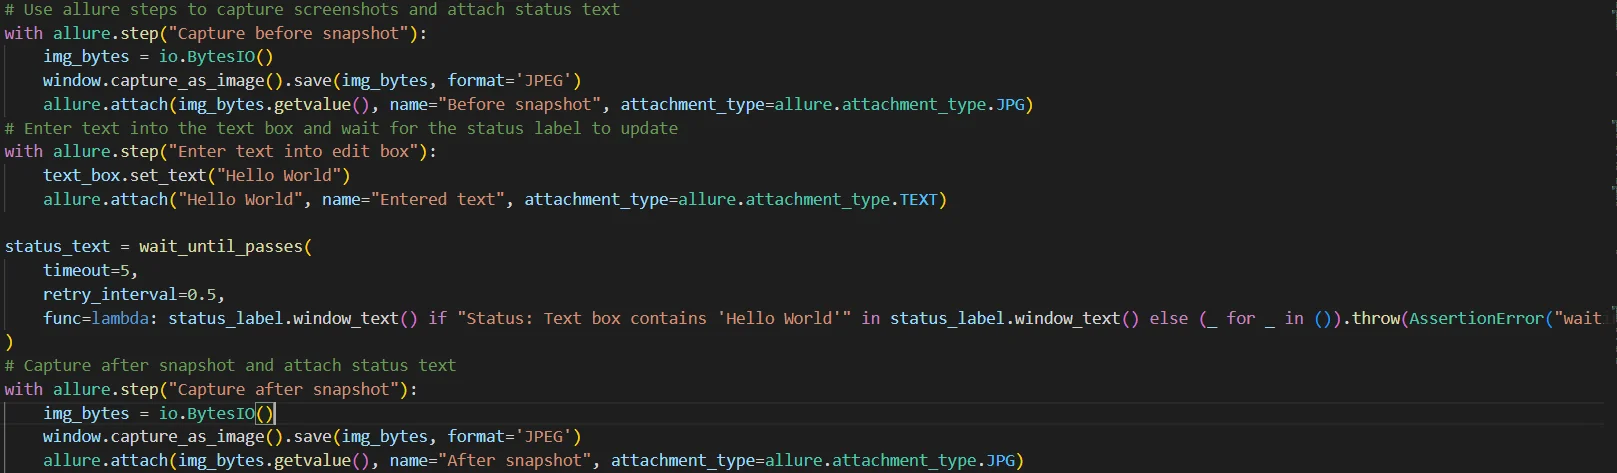
- Attach the status text to the Allure report and assert the expected value:

How to create reports and perform GUI testing automation tests
1. Start automation tests, generate reports with programmatically captured snapshots:
- Run the following command in the terminal: <path-to-python-executable> -m pytest PyWinAuto_Automation_Testing.py –alluredir=allure-results
- Using the command, a folder named “allure-results” containing text, JSON, and image files is created.
2. Generate and view the Allure report
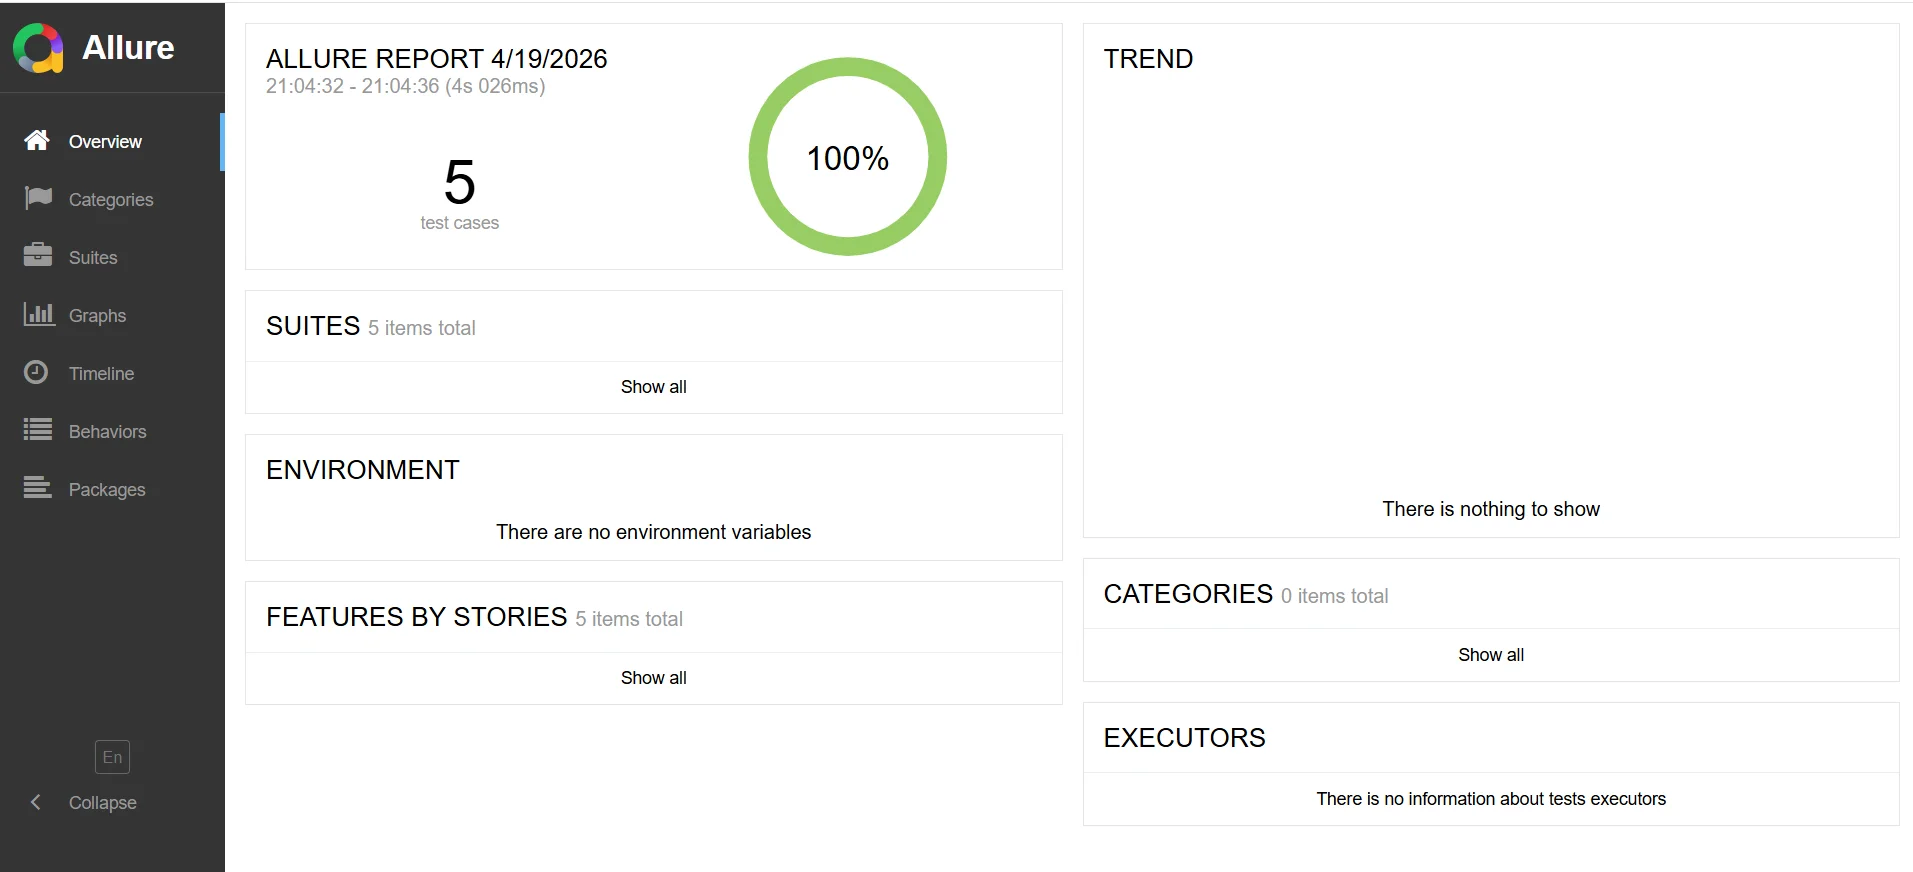
- To read the HTML report, use the terminal and type the following command from the “allure-results” folder’s root directory: allure serve allure-results
- The HTML report opens in the browser as a result:
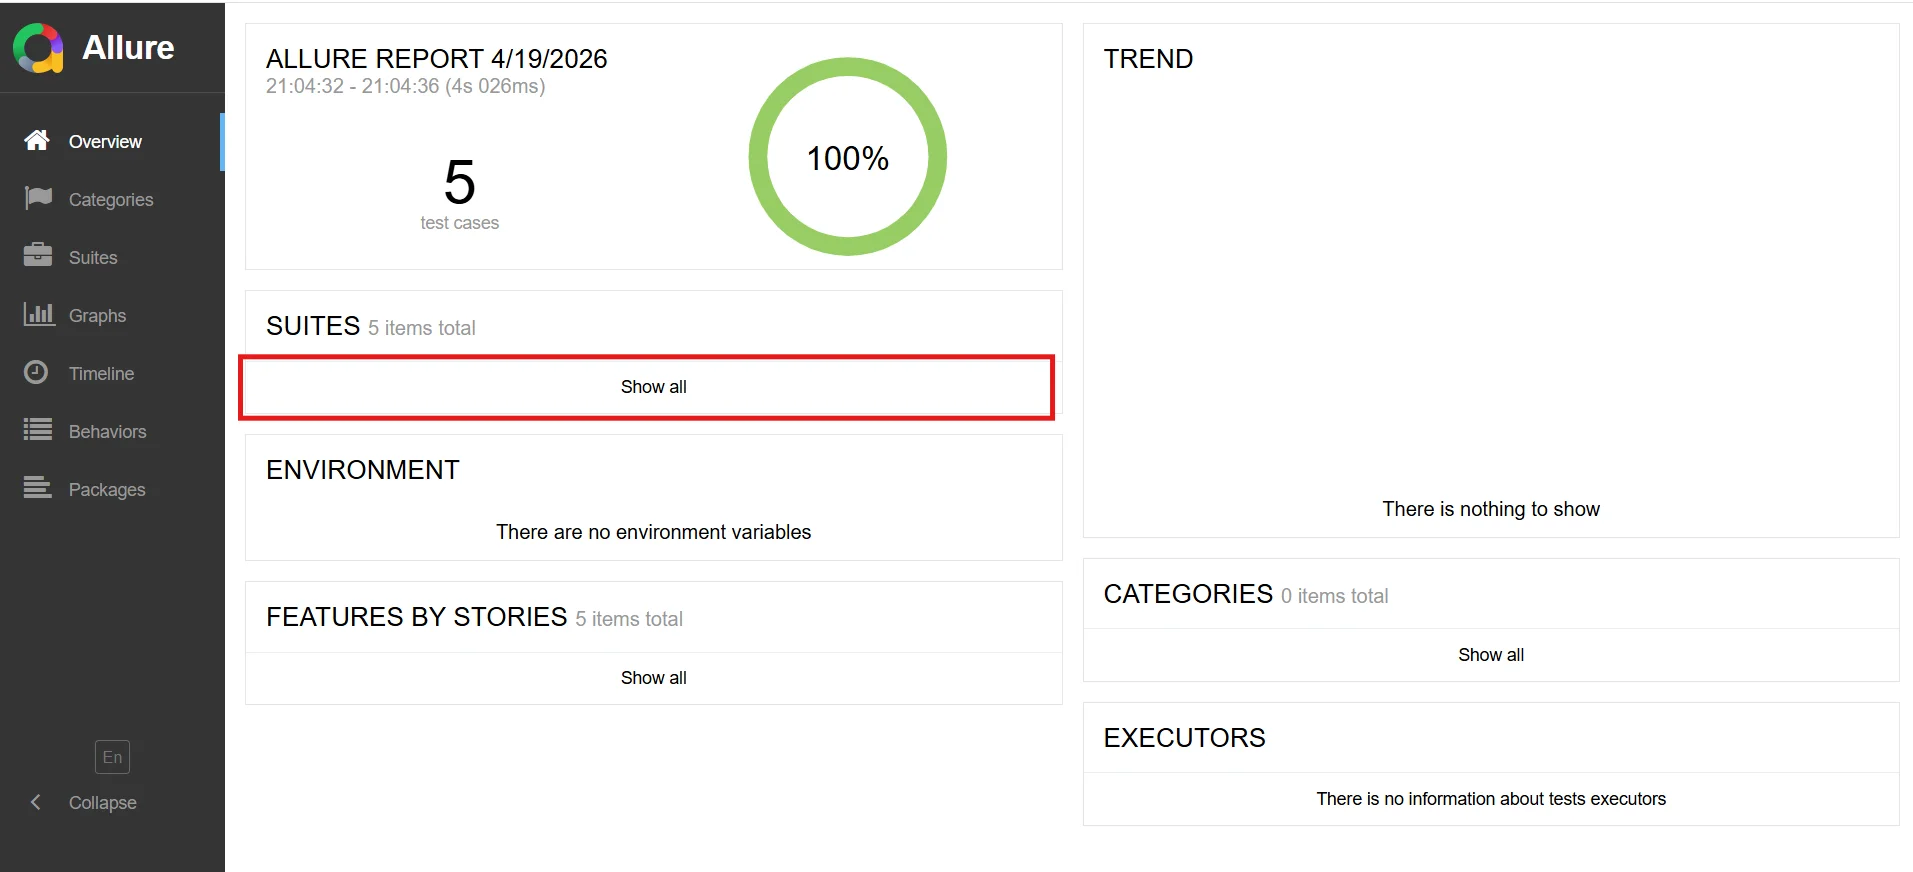
- By selecting the “Show all” button, you can view a detailed report:
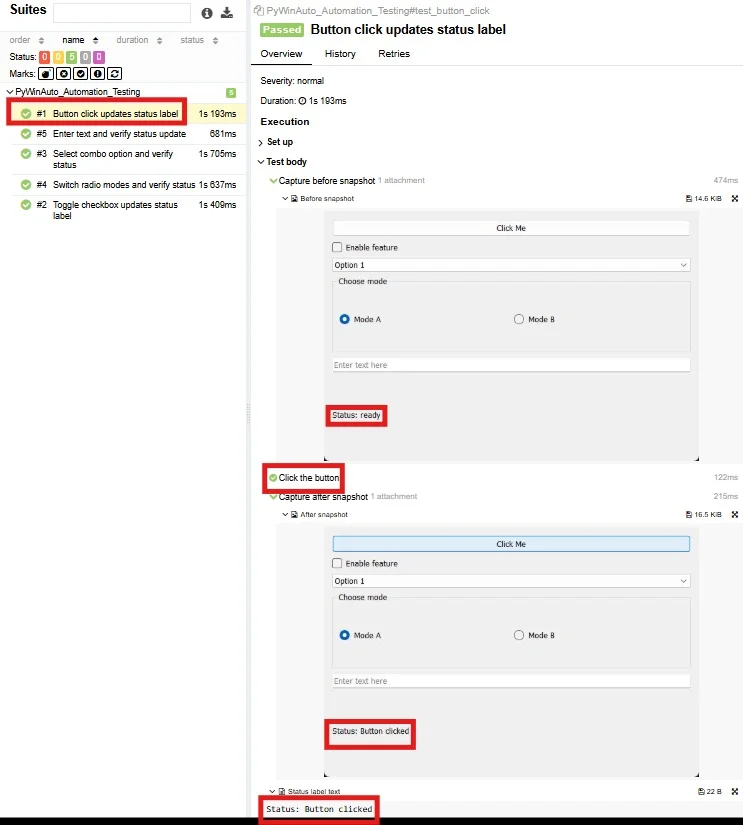
- Choose your preferred test suite, then confirm the actions taken by the test, and the outcomes in the updated texts and snapshots:
- To close the report press “CTRL+C” in the terminal and press “Y” to terminate and close the browser:

References:
- PyWinAuto GitHub: https://github.com/pywinauto/pywinauto
- PyWinAuto Documentation: https://pywinauto.readthedocs.io/en/latest/
- PyWinAuto Getting Started Guide: https://pywinauto.readthedocs.io/en/latest/getting_started.html
- PyWinAuto StackOverflow tag: https://stackoverflow.com/questions/tagged/pywinauto
- Allure Report Command Line Tool (Link: https://allurereport.org/docs/v2/install-for-windows/#install-the-allure-report-cli)
- Allure Report Documentation: https://allurereport.org/docs/
Frequently Asked Questions – UI Automation with PyWinAuto
1) Does pywinauto support headless execution?
- Because pywinauto interacts with the Windows GUI, it requires an active desktop session, it cannot run in a truly “headless” environment (like a standard Linux server). If running on a CI/CD pipeline (e.g. Jenkins or GitHub Actions), you must ensure the runner has an interactive session enabled.
2) Can pywinauto perform image-based testing?
- No. pywinauto is strictly for control-based automation. If your application has custom-drawn UI elements that are not exposed via Windows accessibility APIs, you may need to use a library like OpenCV or PyAutoGUI in conjunction with pywinauto to handle visual verification.
3. Is the allure serve command necessary for report generation?
- No, it is not necessary for production or CI/CD pipelines. allure serve is primarily a development-time convenience tool. It performs three actions in one step: it generates the report, saves it in a temporary folder, and spins up a local web server to display it.
- For production/CI usage, you should use allure generate. This command creates a static, portable HTML report in a designated directory (e.g. allure-report/ ). You can then host these static files on a web server or archive them as build artifacts in your CI/CD tool.
- The –single-file option generates a fully self-contained Allure report as a single HTML file, making it easy to share, archive, and view without requiring a web server. Example usage: allure generate allure-results –single-file -o allure-report to create a standalone HTML report.