Introduction
Nowadays, AI has transcended into our day-to-day life. Whether it’s to get clarity on our doubts or just getting more information about a particular subject, we all rely on AI in some way or the other.
Google launched its generative AI chat bot ‘Gemini’ recently to generate content and solve problems. However, we know that accuracy of these AI models is not up to the mark, and it can generate misleading information. That’s why we should use it wisely.
In this blog we will learn step-by-step to build simple android application with GeminiPro for multi-turn conversation with text + images as an input! Let’s start!
Here’s demo: https://shorturl.at/hirOZ

Prerequisites
Before we proceed let us see the initial requirements to go ahead:
- Android Studio Jellyfish [Canary build] version – 2023.3.1 Canary 9 or above installed (Current stable build does not support building GeminiApp). You can download latest canary builds using this link – https://developer.android.com/studio/preview/
- A working Gmail email ID.
- Basic knowledge of Jetpack Compose.
Setup and get API key of Gemini Pro
Step 1:
Go to https://aistudio.google.com/ [Please sign in into google account if are not already signed in!]. Accept the terms of services and you will see the following screen.

Click on Get API Key to generate your API Key.
Step 2:

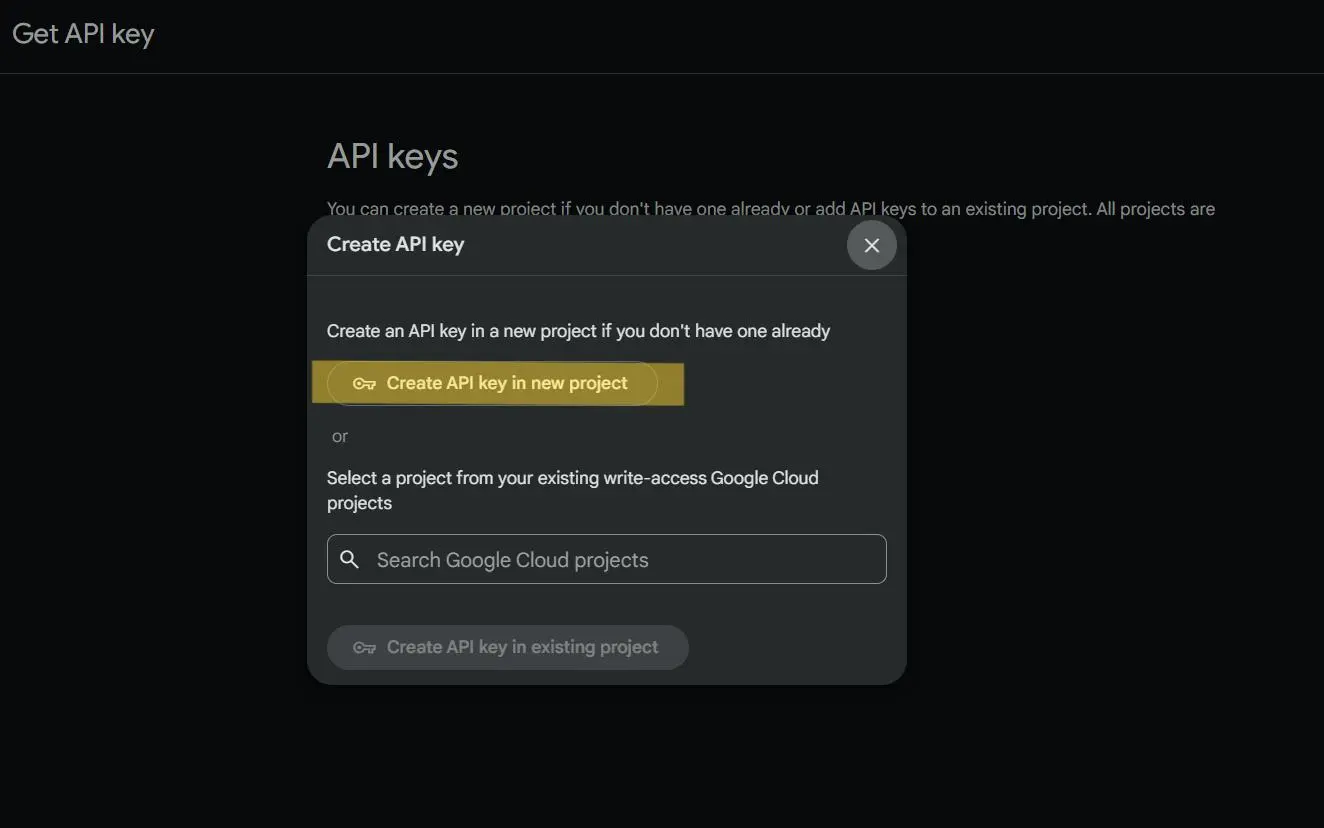
Click on “Create API key in new project”.
Step 3:
You will see your API key as shown in the below image. Copy that key, keep it safe and do not share your key with anyone.

Setup project on Android Studio
Step 1:
Open Android Studio Jellyfish [Canary build] version – 2023.3.1 Canary 9 or higher.

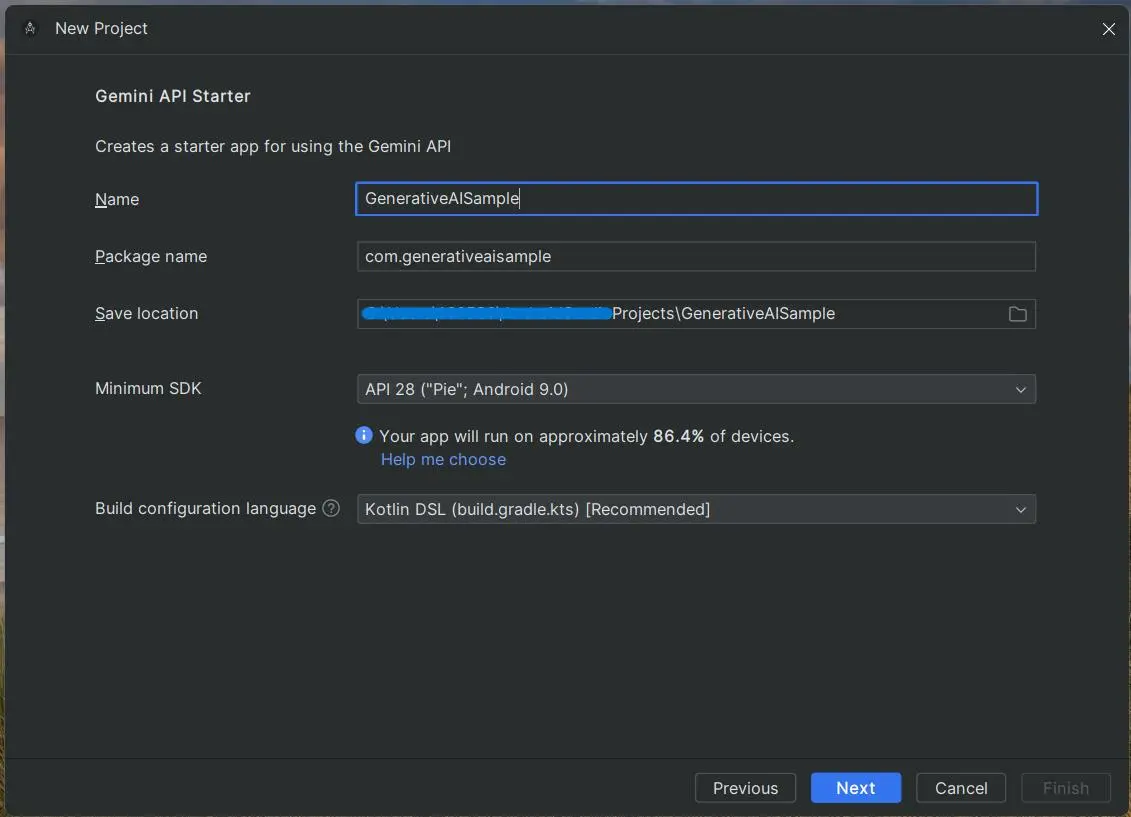
Click on ‘New Project’ and you will see the screen below.

Select template named ‘Gemini API Starter’ and click on Next.
Step 2:

Enter your desired name for the project and Package name accordingly.
Step 3:
Now it will ask for API key of Gemini for setup. Enter the API key that we generated earlier and click on finish.

Customize code as per our need
Now Android Studio will download some required dependencies to setup the project as well as you can see that the project also has some predefined code to Summarize the text using Gemini. But we are not going to use that code so you can remove that code.
We are going to build a conversational app which supports input in 2 formats [text + images].
We will use two different generative models to achieve that.
1. gemini-pro :
This model supports a multi-turn conversational approach which can store temporary history of ongoing conversion with user to generate new answer also based on / by taking reference of user’s previous input and its own earlier outputs. but it only supports text as a user input and doesn’t support image input!
2. gemini-pro-vision
This model supports both text and image input from user and generates text based on that but doesn’t support multi-turn conversational approach so it can’t store history of previous conversation with the user.
So, to build a conversational app which also supports image inputs we’ll use combination of these generative models.
Step 1:
Create simple data class for message.
enum class Sender {
USER, MODEL, ERROR
}

data class Message(
val id: String = UUID.randomUUID().toString(),
var text: String = "",
val sender: Sender = Sender.USER,
var isPending: Boolean = false,
val imageUris: List = listOf()
)
Step 2:
We will use StateFlow for messages to keep our UI updated. For that, create a simple UiState class as below:
class ChatUiState(
    messages: List = emptyList()
) {
    private val _messages: MutableList = messages.toMutableStateList()
    val messages: List = _messages

    fun addMessage(msg: Message) {
        _messages.add(msg)
    }


//To update the pending status of message
    fun replaceLastPendingMessage() {
        val lastMessage = _messages.lastOrNull()
        lastMessage?.let {
            val newMessage = lastMessage.apply { isPending = false }
            _messages.removeLast()
            _messages.add(newMessage)
        }
    }
}
Step 3:
Finally, to interact with UI and the AI Model lets create ViewModel class as “ChatViewModel”. In this class we will also create instances of AI Model.
At first let’s create object of AI Model:
Extra: You can define safety settings as per your need which will prevent the model from generating explicit results. This is optional.
private val safetySetting = listOf(
    SafetySetting(
        harmCategory = HarmCategory.HARASSMENT,
        threshold = BlockThreshold.MEDIUM_AND_ABOVE
    ),
    SafetySetting(
        harmCategory = HarmCategory.HATE_SPEECH,
        threshold = BlockThreshold.MEDIUM_AND_ABOVE
    ),
    SafetySetting(
        harmCategory = HarmCategory.DANGEROUS_CONTENT,
        threshold = BlockThreshold.LOW_AND_ABOVE
    ),
    SafetySetting(
        harmCategory = HarmCategory.SEXUALLY_EXPLICIT,
        threshold = BlockThreshold.LOW_AND_ABOVE
    )
)
val textModel = GenerativeModel(
    modelName = "gemini-pro",
    apiKey = BuildConfig.apiKey, safetySettings = safetySetting
)
val imageModel = GenerativeModel(
    modelName = "gemini-pro-vision",
    apiKey = BuildConfig.apiKey, safetySettings = safetySetting
)
To keep our UI updated and to start the chat with AI Model let’s create chat object and MutableStateFlow as below:
private val chat = textModel.startChat(
    //Empty conversion history at initialization
    history = listOf()
)

private val _uiState: MutableStateFlow =
    MutableStateFlow(ChatUiState(chat.history.map { content ->
        Message(
            text = content.parts.first().asTextOrNull() ?: "",
            sender = if (content.role == "user") Sender.USER else Sender.MODEL,
            isPending = false
        )
    }))
val uiState: StateFlow =
    _uiState.asStateFlow()
To send messages to AI Model lets create sendMessage method as below:
fun sendMessage(userMessage: String /*text from user*/,
                uris: List = listOf() /*URIs of selected images*/,
                selectedImages: List = listOf() /*Bitmaps of selected images*/) {
    _uiState.value.addMessage(
        Message(
            text = userMessage,
            sender = Sender.USER,
            isPending = true,
            imageUris = uris
        )
    )

    viewModelScope.launch {
        try {
            //Create a content to send with images[media]
            val mediaContent = content {
                for (bitmap in selectedImages) {
                    image(bitmap)
                }
                text(userMessage)
                role = Sender.USER.toString().lowercase()
            }
            //Create a content to send without images[media]
            val content = content {
                text(userMessage)
                role = Sender.USER.toString().lowercase()
            }

            val response = if (selectedImages.isNotEmpty()) {
                //Send content with media to imageModel and add it's data to textModel's history
                val res = imageModel.generateContent(mediaContent)
                chat.history.add(content)
                chat.history.add(res.candidates.first().content)
                res
            } else {
                //Send content without media to textModel [It manages history on it's own]
                chat.sendMessage(content)
            }

            //Update the UI
            _uiState.value.replaceLastPendingMessage()
            response.text?.let { modelResponse ->
                _uiState.value.addMessage(
                    Message(
                        text = modelResponse,
                        sender = Sender.MODEL,
                        isPending = false
                    )
                )
            }
        } catch (e: Exception) {
            _uiState.value.replaceLastPendingMessage()
            _uiState.value.addMessage(
                Message(
                    text = e.localizedMessage?:"Error occurred. Please try again",
                    sender = Sender.ERROR
                )
            )
        }
    }
}
Step 4:
Next, let’s create a simple UI to interact with. We are going to use Compose UI components. Create a new file called ‘ChatScreen’ which will have object of ViewModel as constructor parameter as follow:
@Composable
internal fun ChatScreen(
    chatViewModel: ChatViewModel = ChatViewModel()
) {
    val chatUiState by chatViewModel.uiState.collectAsState()//UI State
    val listState = rememberLazyListState()//ListState
    //To get BITMAP from URIs of selected images and Load Image
    val coroutineScope = rememberCoroutineScope()
    val imageRequestBuilder = ImageRequest.Builder(LocalContext.current)
    val imageLoader = ImageLoader.Builder(LocalContext.current).build()
}
To display chat history:
@Composable
fun ChatList(
    messages: List,
    listState: LazyListState
) {
    LazyColumn(
        reverseLayout = true,
        state = listState
    ) {
        items(messages.reversed()) { message ->
            ChatBubbleItem(message)
        }
    }
}

@Composable
fun ChatList(
    messages: List,
    listState: LazyListState
) {
    LazyColumn(
        reverseLayout = true,
        state = listState
    ) {
        items(messages.reversed()) { message ->
            ChatBubbleItem(message)
        }
    }
}
For text input as well as select images:
@Composable
fun MessageInput(
    onSendMessage: (String, List) -> Unit,
    resetScroll: () -> Unit = {}
) {
    var userMessage by rememberSaveable { mutableStateOf("") }
    val imageUris = rememberSaveable(saver = UriSaver()) { mutableStateListOf() }

    val pickMedia = rememberLauncherForActivityResult(
        ActivityResultContracts.PickVisualMedia()
    ) { imageUri ->
        imageUri?.let {
            imageUris.add(it)
        }
    }
    ElevatedCard(
        modifier = Modifier
            .fillMaxWidth()
            .shadow(elevation = 4.dp)
    ) {
        Row(
            modifier = Modifier
                .padding(vertical = 5.dp, horizontal = 10.dp)
                .fillMaxWidth()
        ) {//To select images
            IconButton(
                onClick = {
                    pickMedia.launch(
                        PickVisualMediaRequest(ActivityResultContracts.PickVisualMedia.ImageOnly))
                },
                modifier = Modifier.padding(all = 4.dp)
                    .align(Alignment.CenterVertically)
            ) {
                Icon(
                    Icons.Rounded.Add, contentDescription = "Add     Image")}
            //Text input
            OutlinedTextField(
                value = userMessage,
                label = { Text(stringResource(R.string.chat_label)) },
                placeholder = { Text(stringResource(R.string.summarize_hint)) },
                onValueChange = { userMessage = it },
                keyboardOptions = KeyboardOptions(
                    capitalization = KeyboardCapitalization.Sentences,
                ),
                modifier = Modifier
                    .align(Alignment.CenterVertically)
                    .fillMaxWidth()
                    .weight(0.90f)
            )
            //Send message button
            IconButton(
                onClick = {
                    if (userMessage.isNotBlank()) {
                        onSendMessage(userMessage, imageUris.toList())
                        userMessage = ""
                        imageUris.clear()
                        resetScroll()
                    }
                },
                modifier = Modifier.padding(start = 12.dp)
                    .align(Alignment.CenterVertically).fillMaxWidth()
                    .weight(0.15f)
            ) {
                Icon(
                    Icons.Default.Send, contentDescription = stringResource(R.string.action_send), modifier = Modifier)
            }
        }
        //To display select images
        LazyRow(
            modifier = Modifier.padding(all = 8.dp)
        ) {
            items(imageUris) { imageUri ->
                val showDialog = remember { mutableStateOf(false) }
                if (showDialog.value) {
                    Alert(showDialog = showDialog.value,
                        onDismiss = { showDialog.value = false }) {
                        showDialog.value = false
                        imageUris.remove(imageUri)
                    }
                }
                AsyncImage(
                    model = imageUri,
                    contentDescription = null,
                    modifier = Modifier
                        .padding(4.dp)
                        .requiredSize(72.dp)
                        .clickable {
                            showDialog.value = true
                        }
                )
            }
        }
    }
}

//Remove image confirmation dialog
@Composable
fun Alert(
    showDialog: Boolean,
    onDismiss: () -> Unit, confirmAction: () -> Unit
) {
    if (showDialog) {
        AlertDialog(
            title = {
                Text("Remove image")
            },
            text = {
                Text("Are you sure you want to remove this image?")
            },
            onDismissRequest = onDismiss,
            confirmButton = {
                TextButton(onClick = confirmAction) {
                    Text("Yes")
                }
            },
            dismissButton = {
                TextButton(onClick = onDismiss) {
                    Text("No")
                }
            }
        )
    }
}
//To maintain select image URIs
class UriSaver : Saver<MutableList, List> {
    override fun restore(value: List): MutableList = value.map {
        Uri.parse(it)
    }.toMutableList()

    override fun SaverScope.save(value: MutableList): List =
        value.map { it.toString() }
}
You can use Scaffold to display the above UI components. Use MessageInput as bottomBar of scaffold and ChatList as main Component. To display toolbar, you can use customize topBar of Scaffold. To get Bitmaps from URI you can use following code:
coroutineScope.launch {
    val bitmaps = selectedItems.mapNotNull {
        val imageRequest = imageRequestBuilder
            .data(it)
            // Scale the image down to 768px for faster uploads
            .size(size = 768)
            .precision(Precision.EXACT)
            .build()
        try {
            val result = imageLoader.execute(imageRequest)
            if (result is SuccessResult) {
                return@mapNotNull (result.drawable as BitmapDrawable).bitmap
            } else {
                return@mapNotNull null
            }
        } catch (e: Exception) {
            return@mapNotNull null
        }
    }
Finally call sendMessage of chatViewModel like this:
chatViewModel.sendMessage(inputText, selectedItems, bitmaps)
Now finally run the application on your device and witness the magic that you’ve just created!
I’ve created an SDK for plug-n-play usage. You can get full demo source code form here: https://github.com/terminator712/Gemini-Multi-turn-Chat
Conclusion
So, we’ve created a simple that can communicate with Gemini API and get response of your query which can be either text or image or both. Although this does not have a cache mechanism or storage / database to store history of our chat.
It is good to use all types of AI with proper safety settings to avoid explicit and inappropriate results.
Also, as everyone knows, these kind of chat bots can generate wrong/partially wrong results sometimes. So, we should always use AI wisely and should not trust response of AI every time blindly!


