An Overview
Frontend teams frequently face increasing difficulties as contemporary web applications grow, including large codebases, sluggish builds, intricate deployments, and conflicting code ownership amongst teams.
Micro Frontend Architecture (MFE) can address these issues. It applies the backend microservices concepts to the frontend. Due to the Webpack 5 Module Federation, micro frontends in Angular initially became popular around Angular 12.
However, at that time, they required a fair amount of setup and specialized tools. Angular’s ecosystem changed over time, and by Angular 20, MFE development was smooth thanks to the @angular-architects/native-federation library.
It now avoids clumsy Webpack overrides and eliminates the need for tricks. The Angular CLI is natively integrated with everything.
Micro frontend architecture also leverages new technologies to address modern frontend challenges, enabling teams to adopt innovations like AI, big data, and generative AI for more flexible and scalable web applications.
This tutorial explains what micro frontends are, their importance, when to use them, and how to create them using Angular.
Learning Goals
By the end of this article, you will know:
- The definition of Micro Frontend Architecture
- The key features of micro frontend architecture in Angular 20
- Reasons why Angular 20 is great for frontend systems that are made up of separate parts.
- Setting up a host and several remote apps
- Setting up routing, dependencies, and communication
- Best methods to improve performance, deploy, and keep things running
Prerequisites
Before starting, it is important to have the following:
- Node.js version 18 or higher: Download Node.js
- Angular CLI 17 or higher: Angular CLI Documentation
- Knowledge of TypeScript, Angular routing, and basic JavaScript
- Download VS Code if a code editor is required
Also install Angular CLI globally:
- npm install -g @angular/cli
What is Micro Frontend Architecture in Smart Retail Solutions?
Micro frontend architecture breaks down the huge monolithic frontend of the app into a few small, independent frontend applications collectively called micro frontends.
Each MFE responsible for a specific functionality (e.g., dashboard, profile, or reports) can thus be developed, tested, and released by entirely different teams of developers without any coordination.
Think of a big enterprise app where the teams turning the analytics, billing, and user management wheels are each building their own Angular application. Micro frontends allow them to be seamlessly integrated into one working unit. This seamless integration of independently developed micro frontends is a key benefit of micro frontend architecture, enabling efficient collaboration and unified user experiences.
Why, When, and Where to Use Micro Frontends?
Why Use Micro Frontends for Operational Efficiency?
- Scalability: Multiple teams can develop them in parallel.
- Faster Deployments: Each feature can be released independently.
- Simplified Maintenance: Smaller, focused codebases.
- Tech Flexibility: You can even mix frameworks (e.g., Angular + React + Vue).
- Clear Boundaries: Each domain stays isolated and there are fewer regressions.
- Improved Operational Efficiency: Micro frontends help optimize processes and resource allocation, leading to better performance and cost savings.
- Streamline Operations: By enabling modular development and deployment, micro frontends make it easier to automate and optimize workflows.
When to Use Them?
- An app is large and growing rapidly.
- Multiple teams work on different domains.
- Independent releases are crucial.
- There is a need for separate deployment pipelines.
When to Not Use Them?
- One team maintains small applications.
- Projects with frequent cross-module changes.
- Simple dashboards or prototypes.
Where do Micro Frontends Shine?
- Enterprise admin portals
- E-commerce platforms
- SaaS dashboards
- Multi-tenant applications
- Retail business
- Retail solutions
- Smart retail solutionsShape
Why Angular 20 + Native Federation- A Perfect Combo
The official @angular-architects/native-federation plugin brought Native Module Federation to Angular 20. It is fully integrated with Angular CLI and runs on Webpack 5 Module Federation. As a result, micro frontends can now be built and loaded natively without requiring any special Webpack configuration.
Principal Benefits:
- Works flawlessly with both Angular 20 and Angular CLI 17+
- Quicker incremental builds
- Sharing of dependencies automatically
- Configuration cleaner; no manual Configuring Webpack
- Lazy loading, SSR, and SSG are supported.
- Enables a more flexible and modular tech stack, allowing integration of various tools and systems to streamline operations and support advanced features.
How does the Native Federation Work?
With Native Federation, the main app (the “Shell”) can load other Angular apps on the fly during runtime.
Every micro frontend is giving out a remoteEntry.json file which is the metadata about its modules.
The shell utilizes that file to load and display the remote module like it is a local one.
Angular handles version conflicts and dependency sharing so that the focus can be on the features.
Step-by-Step: Building Micro Frontends in Angular 20 for Enhanced Customer Experience
Let us build a simple workspace with:
- One Shell (Host)
- Two Micro Frontends (MFE1 and MFE2)
Step 1: Create a new Angular workspace
When prompted:

Then navigate into your workspace:
What does this do?
- ng new mfe-workspace creates a new Angular workspace (project root with angular.json, package.json, etc.).
- –create-application false tells the CLI not to create a default application. We want a multi-project workspace (host + remotes), this keeps the workspace clean and lets us generate multiple apps under projects/.
- cd mfe-workspace moves into the workspace folder.
Why do we do it?
- A multi-app workspace makes local development easier: remotes and shell live in the same repository and can be referenced with relative paths during development.
Step 2: Add Native Federation plugin
# follow prompts; set project name to “mfe-workspace” .
ng add @angular-architects/native-federation
When prompted:
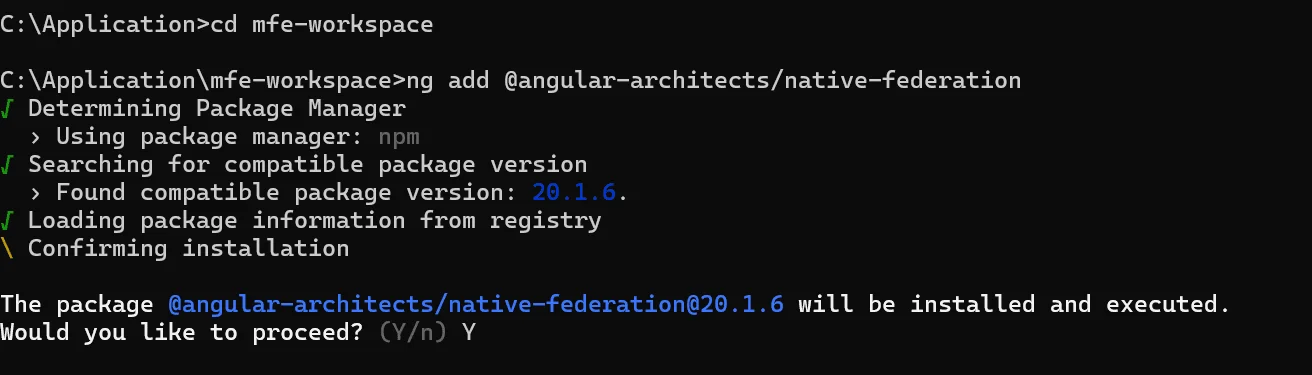
What does this do?
- Installs the native federation tooling and its schematic.
- Adds the configuration helpers (a wrapper around Webpack Module Federation that integrates with Angular’s builder).
- It may add or modify build/server configurations to enable native Module Federation behavior.
Why do we do it?
- Module Federation wiring (exposes/remotes/shared) is not part of Angular CLI by default. This plugin provides opinionated integration so Angular apps can act as host or remote.
Step 3: Create the Shell (Host) app
ng generate application shell –routing –style=scss
When prompted:

This generates a new Angular app under projects/shell.
Then configure it as a federation host:
ng add @angular-architects/native-federation –project shell –type host

Generated pieces are as follows:
- projects/shell/src/app/… — app code
- projects/shell/src/app/app-routing.module.ts — routing module (because –routing)
- projects/shell/federation.config.js (created/updated by the schematic) — Module Federation config for the host.
What does the type host do?
- Sets up the shell to be a host application (it will consume remote modules). The plugin will create/adjust the host’s federation.config.js and builder hooks so the host knows how to resolve remotes.
Example: host federation.config.js (annotated)
const{withNativeFederation, shareAll} = require(‘@angular-architects/native-federation/config’);module.exports = withNativeFederation({
name: ‘shell’,
remotes: {
mfe1: “http://localhost:4 201/remoteEntry.json”,
mfe2: “http://localhost:4202/remoteEntry.json”
},
shared: {
…shareAll({ singleton: true, strictVersion: true, requiredVersion: ‘auto’ }),
},
skip: [
‘rxjs/ajax’,
‘rxjs/fetch’,
‘rxjs/testing’,
‘rxjs/webSocket’,
],
features: {
ignoreUnusedDeps: true
}
});
Important details:
- remoteEntry.json is the manifest that the remote exposes: it lists what the remote provides (exposed modules) and the runtime bootstrap for Module Federation.
- Singleton: true is especially important for Angular libs (like @angular/core) so that you do not have two different copies of Angular in the page (which causes DI, providers, NgZone, etc. to stop working).
- StrictVersion: true will throw an error if the versions of the host and remote are not compatible, a feature that is especially useful during development, but which is sometimes softened in complex deployment scenarios.
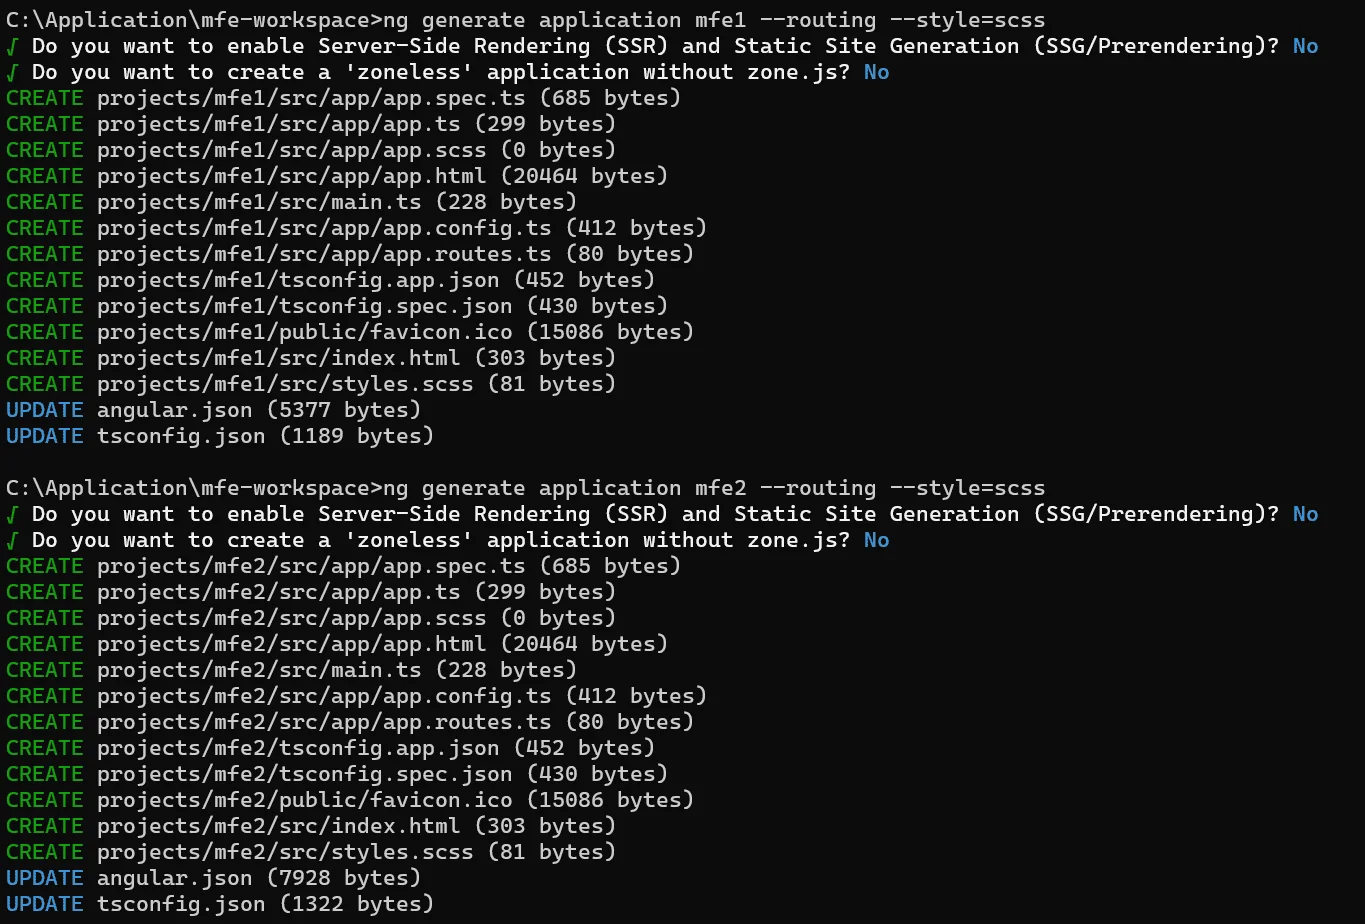
Step 4: Create remote applications
First, create two remote applications — mfe1 and mfe2.
# for mfe1ng add @angular-architects/native-federation –project mfe1 –type remote
# for mfe2
ng add @angular-architects/native-federation –project mfe2 –type remote
When prompted:
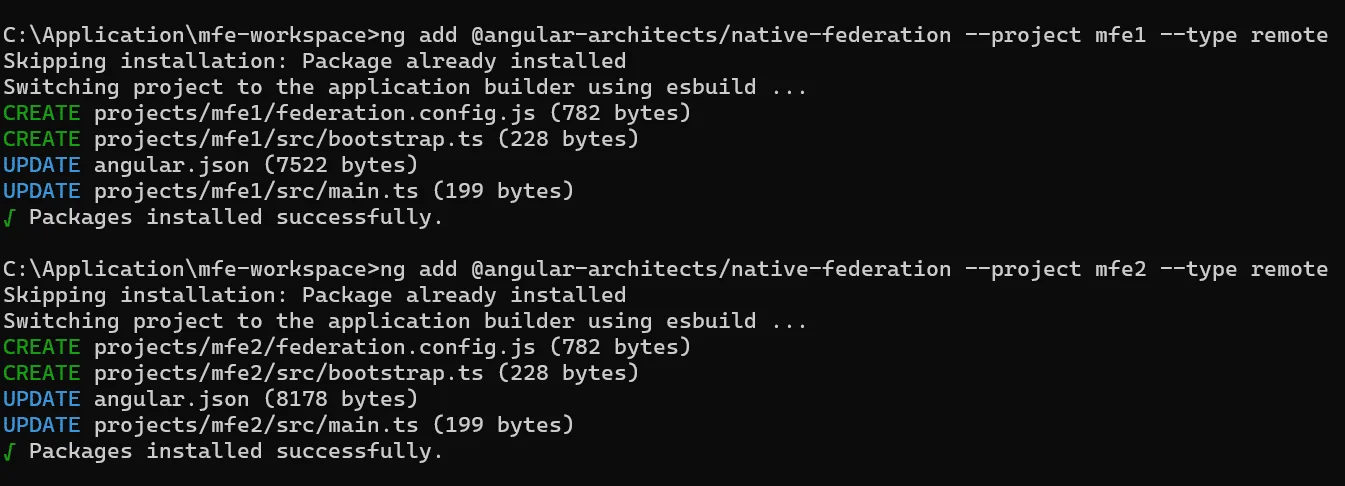
What happens?
- Each remote gets its own projects/mfeX folder and a federation.config.js.
- The schematic will prepare the remote to expose modules/components so the host can import them at runtime.
Example: remote federation.config.js (annotated)
# for mfe1 >> \mfe1\federation.config.jsconst { withNativeFederation, shareAll } = require(‘@angular-architects/native-federation/config’);
module.exports = withNativeFederation({
name: ‘mfe1’,
filename: ‘remoteEntry.json’,
exposes: {
‘./AppRoutes’: ‘./projects/mfe1/src/app/app.routes.ts’,
‘./Mfe1Home’: ‘./projects/mfe1/src/mfe1-home/mfe1-home.ts’
},
shared: {
…shareAll({ singleton: true, strictVersion: true, requiredVersion: ‘auto’ }),
},
skip: [
‘rxjs/ajax’,
‘rxjs/fetch’,
‘rxjs/testing’,
‘rxjs/webSocket’,
],
features: {
ignoreUnusedDeps: true
}
});
# for mfe2 >> \mfe2\federation.config.jsconst { withNativeFederation, shareAll } = require(‘@angular-architects/native-federation/config’);
module.exports = withNativeFederation({
name: ‘mfe2’,
filename: ‘remoteEntry.json’,
exposes: {
‘./AppRoutes’: ‘./projects/mfe1/src/app/app.routes.ts’,
‘./Mfe2Home’: ‘./projects/mfe1/src/mfe1-home/mfe1-home.ts’
},
shared: {
…shareAll({ singleton: true, strictVersion: true, requiredVersion: ‘auto’ }),
},
skip: [
‘rxjs/ajax’,
‘rxjs/fetch’,
‘rxjs/testing’,
‘rxjs/webSocket’,
],
features: {
ignoreUnusedDeps: true
}
});
The importance of exposes:
- exposes tells Module Federation what parts of the remote can be loaded by other apps.
- Example keys such as ./AppRoutes are just some random names; the host will use them by that name.
Step 5: Configure federation (host federation.config.js)
The key idea is that the remotes field in the host maps remote names to the URL of the remote’s remoteEntry.json (this is how the host downloads their manifest/runtime at runtime).
Step 6: Assign Ports (dev)
There are two ways to set ports:
Option A — CLI when serving
This sets the runtime port for this ng serve execution only.
Option B — angular.json per-project configuration
Edit angular.json (excerpt) to set default port:
{“projects”: {
“mfe1”: {
“architect”: {
“serve”: {
“options”: {
“port”: 4201
}
}
}
},
“mfe2”: {
“architect”: {
“serve”: {
“options”: {
“port”: 4202
}
}
}
},
“shell”: {
“architect”: {
“serve”: {
“options”: {
“port”: 4200
}
}
}
}
}
}
Why do ports matter?
- Module Federation requires the host to fetch http://localhost:4201/remoteEntry.json — so the remote must actually be served at that address.
- If a remote is on a different domain, use that full URL.
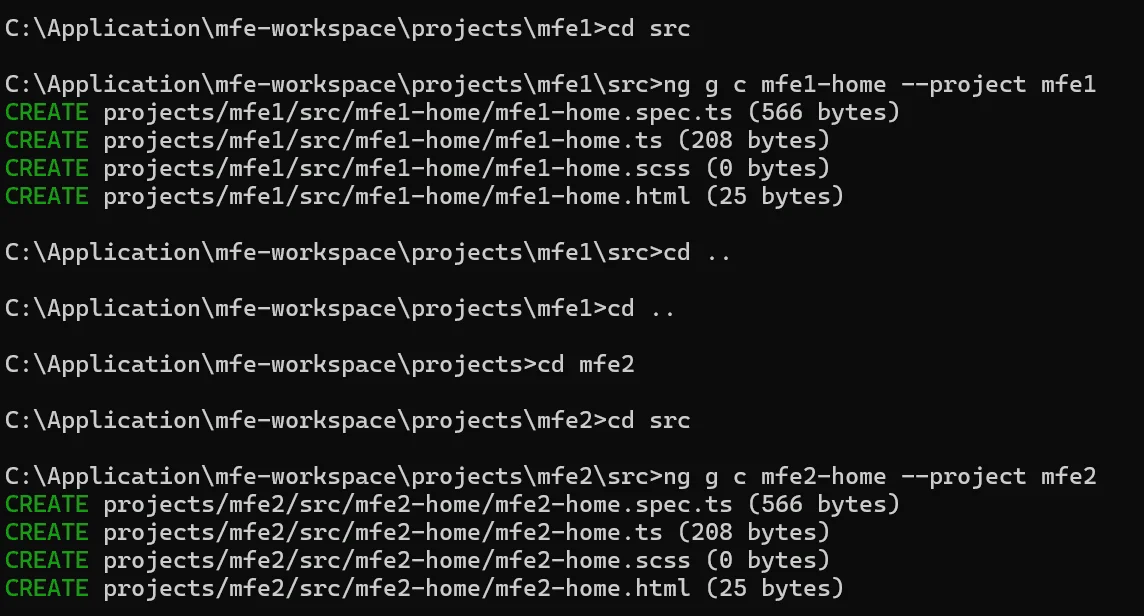
Step 7: Create Home Components (in each app)
ng g c mfe1-home –project mfe1
Create a route file and a simple component for the remote home.
projects/mfe1/src/app/app.routes.ts
import { Routes } from ‘@angular/router’;import { Mfe1Home } from ‘../mfe1-home/mfe1-home’;
export const routes: Routes = [
{ path: ”, component: Mfe1Home }
]; // // When shell routes to ‘/mfe1’, the remote’s exported routes get mounted.
projects/mfe1/src/app/mfe1-home/mfe1-home.component.ts
import { Component } from ‘@angular/core’;
@Component({
selector: ‘app-mfe1-home’,
imports: [],
template: ‘
MFE1 Home
Loaded from remote mfe1
‘,
styleUrl: ‘./mfe1-home.scss’
})
export class Mfe1Home { }
Follow same approach for the mfe2
ng g c mfe2-home –project mfe2
projects/mfe2/src/app/app.routes.ts
import { Routes } from ‘@angular/router’;
import { Mfe2Home } from ‘../mfe2-home/mfe2-home’;
export const routes: Routes = [
{ path: ”, component: Mfe2Home }
]; // // When shell routes to ‘/mfe2’, the remote’s exported routes get mounted.
projects/mfe1/src/app/mfe2-home/mfe2-home.component.ts
import { Component } from ‘@angular/core’;
@Component({
selector: ‘app-mfe2-home’,
imports: [],
template: ‘
MFE2 Home
Loaded from remote mfe2
‘,
styleUrl: ‘./mfe2-home.scss’
})
export class Mfe2Home { }
Notes:
- The routes export is a smallest-unit approach: remote exposes a routes constant that the host can dynamically import and use for lazy routing.
- Alternatively, remotes often expose a module (NgModule) or a single component.
Step 8: Configure Shell Routes (host app)
An example of shell routes:
Line-by-line explanation
- path: ‘mfe1’ — route in the shell at /mfe1.
- loadChildren: () => import(‘./../../../mfe1/src/app/app.routes’).then(m => m.routes):
This is a dynamic import (ES module dynamic import).- In a monorepo (dev workspace), this directly loads the remote’s app.routes.ts file from the local file system and is quick and convenient for local development.
- .then(m => m.routes) returns the exported routes from the remote module (the routes constant that we created).
- loadComponent is the new Angular standalone components loader (if ShellHome is a standalone component), useful when you want to lazy load a single component instead of a module.
An important distinction between a monorepo dev vs deployed remote:
- Monorepo dev: direct relative import works because the remote code exists in the same bundle scope at build time, or the plugin rewrites imports.
- Distributed production: One typically uses the Module Federation to fetch the remote’s exposed module at runtime (the host pulls remoteEntry.json and then invokes the remote). The remotes config in the host federation.config.js handles this. The plugin automates resolving the import to the remote when configured correctly.
Step 9: Shell Template (UI)
Add RouterModule For route changes
import { Component, signal } from ‘@angular/core’;import { RouterOutlet, RouterModule } from ‘@angular/router’;
@Component({
selector: ‘app-root’,
imports: [RouterOutlet, RouterModule],
templateUrl: ‘./app.html’,
styleUrl: ‘./app.scss’
})
export class App {
protected readonly title = signal(‘shell’);
}
What does this do?
- routerLink changes the URL to the path handled by shell routes.
- When the user goes to /mfe1, Angular Router runs the loadChildren function, which dynamically loads the remote’s routes/components.
- <router-outlet> is where the loaded route components render, this can be remote code running in the same DOM.
Step 10: Run the apps (local development)
Start the remotes first, then the shell:
ng serve mfe1 –port 4201 ng serve mfe2 –port 4202 ng serve shell –port 4200 // Then open http://localhost:4200
![]()
![]()
![]()
Why remotes first?
- When the shell tries to load a remote (via Module Federation runtime), it fetches http://localhost:4201/remoteEntry.json.
- If the remote is not running, the host fails to fetch the manifest or fail to load the exposed module, and the browser console shows 404 or network errors.
Common Pitfalls and Debugging Tips
- remoteEntry.json 404: The remote server is not running or the URL of the remote in the host remotes mapping is incorrect. Check the network tab for more information.
- Duplicate Angular runtime / injector errors: Make sure that the shared config has singleton: true and that the versions match.
- Version mismatch: The strictVersion: true will raise errors if the versions of the host and remote are different. You can either synchronize the versions or change the level of strictness during development.
- CORS: If the host and remotes are on different origins in dev, make sure that servers allow CORS access to remoteEntry.json.
- Paths: Relative imports (monorepo) are good for local development; however, for a real remote deployment, access the exposed module via Module Federation (host remotes mapping).
Instantly it becomes possible to switch from one micro frontend to another, each of them are loaded on the fly.
Best Practices for Micro Frontends in Angular
- Dependency Sharing: Implement shareAll() with caution, share Angular core packages but keep away from unnecessary global libraries.
- Route Isolation: Routes of each app should be kept local to prevent the paths from colliding.
- Lazy Loading: Implement loading of micro frontends only when they are required to save the initial bundle size.
- Independent CI/CD: Every MFE must have its own build and deploy pipeline, this is the way to ensure totally independent releases.
Communication Between Apps
Apps Use:
- Shared services in Angular
- An RxJS Subject
- Browser custom events
SEO and Performance
- Angular Universal can be used for SSR and prerendering.
- Remote bundles can be cached through CDN.
- Preloading of frequently used MFEs can be one of the ways to enhance the user’s perception of the app’s performance.
Real-World Scenarios
| E-commerce | Teams oversee cart, checkout, and recommendation processes separately. |
| Enterprise Dashboards | Modularization of reports, users, and analytics for isolation. |
| SaaS Platforms | Different clients can receive different sets of modules dynamically. |
Folder Structure Overview
mfe-workspace/├── angular.json
├── package.json
├── projects/
│ │
│ ├── shell/
│ │ │
│ │ ├── federation.config.js
│ │ └── src/
│ │ │
│ │ └── app/
│ │ └── app.routes.ts
│ │
│ ├── mfe1/
│ │ │
│ │ ├── federation.config.js
│ │ └── src/
│ │ │
│ │ └── app/
│ │ │
│ │ ├── app.routes.ts
│ │ └── mfe1-home/
│ │
│ └── mfe2/
│ │
│ ├── federation.config.js
│ └── src/
│ └── …
Common Pitfalls and How to Avoid Them
Version conflicts: Continuously maintain dependency versions and do not forget to share Angular core packages.
Route collisions: Always assign each remote a unique path.
Slow startup: MFE should be lazy-loaded, and caching should be supported to solve the problem.
Broken communication: Shared state or event buses should be used; direct imports should not be used.
Conclusion
Micro Frontend Architecture is a concept that treats the frontend world as more modular, scalable, and autonomous.
Thanks to Native Federation and Angular 20, MFE is no longer a complicated trial but rather a production-ready, officially supported pattern.
If the team structure, product size, or release cycle is such that it requires working with flexibilities, then apply it.
In case of small app, keep it simple.
Nevertheless, if they are correctly done, Micro Frontends empower the teams to be able to move faster, release independently, and maintain large-scale apps with certainty.